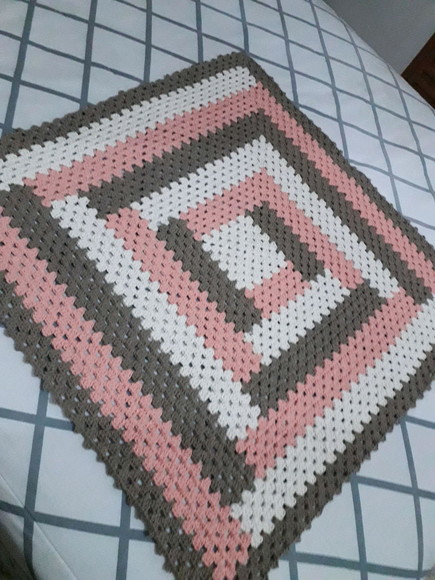
Fans are essential items for those hot days or when we need a more airy environment. People who stay indoors are usually those who suffer most from the effects of heat. Learn how to clean a fan and learn to make a beautiful Vintage Style Crochet Blanket Pattern: This is because in places like office rooms, there are lots of electronic equipment, high-powered lamps, printers, computers and they throw a lot of hot air the environment. The fan, be it ceiling or floor, is the solution to give some freshness in these cases or on days with very high temperatures. The point is that they collect dust and waste as they are used.
If you have never paid attention to whether your fan is dirty or suitable for use, then take a look at the tips in today’s post. Why is it important to clean the fan? The fan is an equipment composed of blades that circulate the air from a rotating movement. If these shovels or other components of the appliance are full of dust or debris adhered to them, the dust will be thrown into the environment.
All this dust suspended in the air will bring or aggravate respiratory problems and allergies for those who live in it and that is why it is very important to keep your ventilator always totally clean and suitable for use.
free available pattern: Vintage Style Crochet Blanket Pattern
Necessary materials
The materials needed to clean a fan may vary depending on the type of equipment you use. If it is ceiling or floor, if it is portable or tower type. In general you will need the following items:
Screwdriver or Phillips Wrench
Dry cloth or absorbent paper
Water
Neutral detergent
1. Turn off the equipment
Never, under any circumstances, perform maintenance or cleaning electrical equipment while they are plugged in. Therefore, to ensure your safety, it is not enough to leave the button in the off position, it is important that the socket is fully
disconnected from the wall.
2. Dismantle the equipment
Traditional fans, in general, have a housing around the blades to protect users, but this housing prevents you from being able to properly clean all the corners where dust and dirt lodge inside the fan. For cleaning to be effective, disassemble your fan using the screwdriver and the manufacturer’s guidelines.
3. Clean the parts
Remove the bulk of the dirt with a soft brush. If the fan has not been cleaned for a long time or if it is exposed to grease, remove as much of the coarse dirt available in the fan as possible in this step.
4. Wash the parts
Using water, neutral detergent and a soft sponge, wash the parts thoroughly until all the dirt has been completely removed. Do not splash water on parts that have electronic components. These should be cleaned with a soft brush or dry cloth.
5. Dry the parts
Dry all parts that have been washed in soap and water well with a soft cloth or absorbent paper so that they are completely dry.
6. Assemble the equipment
Assemble the fan by fitting all parts in place and screwing everything correctly. If you want, put a drop of lubricating oil in the propeller socket so that it works better when it freshens you. When fitting the propeller, check the mark that tells which side it should be inserted.
Are you enjoying it? Also check out these Free Patterns:
➥ Lisbon Tile Block
➥ Movement in Squares Quilt
➥ Circle of Friends Block
Image By: Dada’s Place