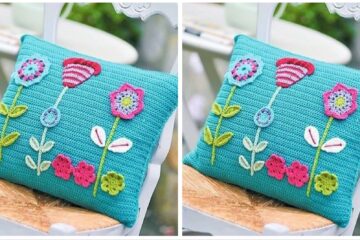
Crochet Cushion Cover (Flower design), handcrafted, with techniques such as knitting or crochet, in addition to cozy, stand out for its texture and exclusivity they have. It’s the small details that make all the difference in the decor. Crochet is a technique that allows for very elaborate and delicate work and can be used in various ways in your home decor or in clothes for your family.
To enrich environments such as bedrooms, living rooms or balconies, bet on pillows to provide a more pleasant and comfortable atmosphere, they can surprise you. The line shared here is just a suggestion to learn how to make this beautiful Cushion cover with a stitch that can make your product a beautiful highlight.
Pillows are ever-changing decorative items, and you can have many of many different types in one room, which can guarantee you incredible looks. Pillows can be simple or fun, monochromatic or full of color, and even romantic with these flowers.
See Also:
➽ A Cosy Christmas Cushion Crochet
➽ Crochet Bobble Stitch Baby Dress
➽ Twilight Shells Throw Crochet
Crochet Cushion Cover (Flower design)
Making the Cushion Cover
Materials
Crochet hook
Crochet Hook: 12mm
yarn needle
scissors
18 inch pillow form
3 Lion Brand Wool-Ease skeins
Abbreviations (U.S. terms)
ch – chain
yo – yarn over
sl st – slip stitch
st/sts – stitch(es)
TKS – Tunisian knit stitch
TSS – Tunisian simple stitch
TSSBLO – Tunisian simple stitch back loop only
Return – work a return pass
SC – single crochet
revSC – reverse single crochet (crab stitch)
Use a hook that is at least 2 sizes larger than the recommended hook on the yarn.
Hayfields Pillow – Tunisian Crochet Pillow Cover Pattern
The Pattern (panel one – Tunisian Knit Stitch side)
ch 32
Row 1: Starting in the 2nd ch from the hook and working into the back bump, draw up a loop; repeat in each st across. Return.
Row 2 – 35: TKS in each st across. Return.
Row 36 (sl st bind off): Starting in the 2nd vertical bar, * insert hook TKSwise, yo, pull through both loops on hook; repeat from * across
Fasten off and weave in all ends
The Pattern (panel two – Tunisian Straw Stitch side)
ch 32
Row 1: Starting in the 2nd ch from the hook and working into the back bump, draw up a loop; repeat in each st across. Return.
Row 2 – 29: *TSS, TSSBLO; repeat from * across. Return. See Tunisian Simple Stitch BLO photo instructions above.
Row 30 (sl st bind off): Starting in the 2nd vertical bar. *insert hook TKSwise, yo, pull through both loops on hook, insert hook TKSBLOwise, yo, pull through both loops on hook; repeat from * across, ch 1
DO NOT CUT YARN. Proceed to finishing section.
Click HERE to purchase the PDF version of the Hayfields Pillow pattern from Ravelry!
Finishing
Place panels together wrong side to wrong side taking care to ensure the orientation of the panels are in the preferred position. You will be seaming the pillows together right side out because you will be crocheting a crab stitch border in the join seam.
Using the 12mm traditional crochet hook, begin seaming the panels together by single crocheting around 3 edges of the panels. (Maker Tip: Use stitch markers to hold the panels together while seaming.)
Insert pillow form into pillow cover and continue seaming the pillow cover closed using single crochets. Sl st to the first sc in this round.
Chain 1 and work a row of reverse single crochets (crab stitch) into each sc that was made to seam the pillow together.
Cut yarn, fasten off, weave in ends.
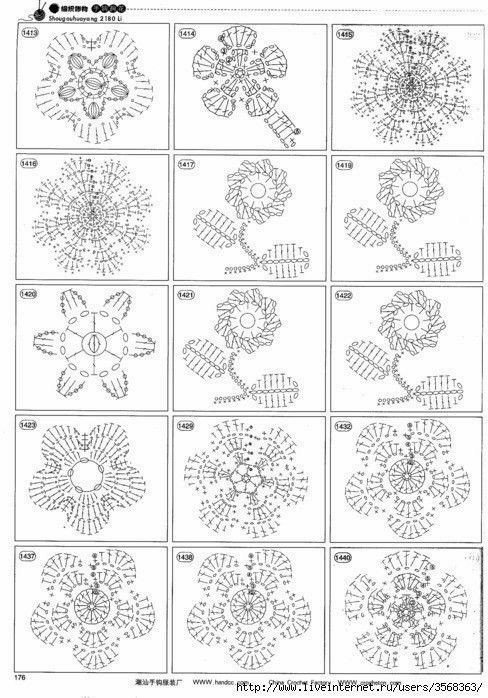
flower design
See schematic for flower designs to choose from for the cushion cover
Our Team’s Opinion About This Pattern
Crochet Cushion Cover (Flower design), an amazing piece that will help you change the face of the ambience, I’m sure you’re gonna love the result of this piece on your decor. This is a pick that is aways needed, that’s why it is so famous. This will surely make your customers want one like it, which will help you in sales!!
Want to make this amazing Crochet Cushion Cover (Flower design)? Then set aside all your material and tools before starting your piece so that you already have everything close at hand, this way it’ll be easy to carry out this project, follow the tutorial carefully, make your piece while following the tutorial and I’ m sure that you will be able to make this amazing work easily.