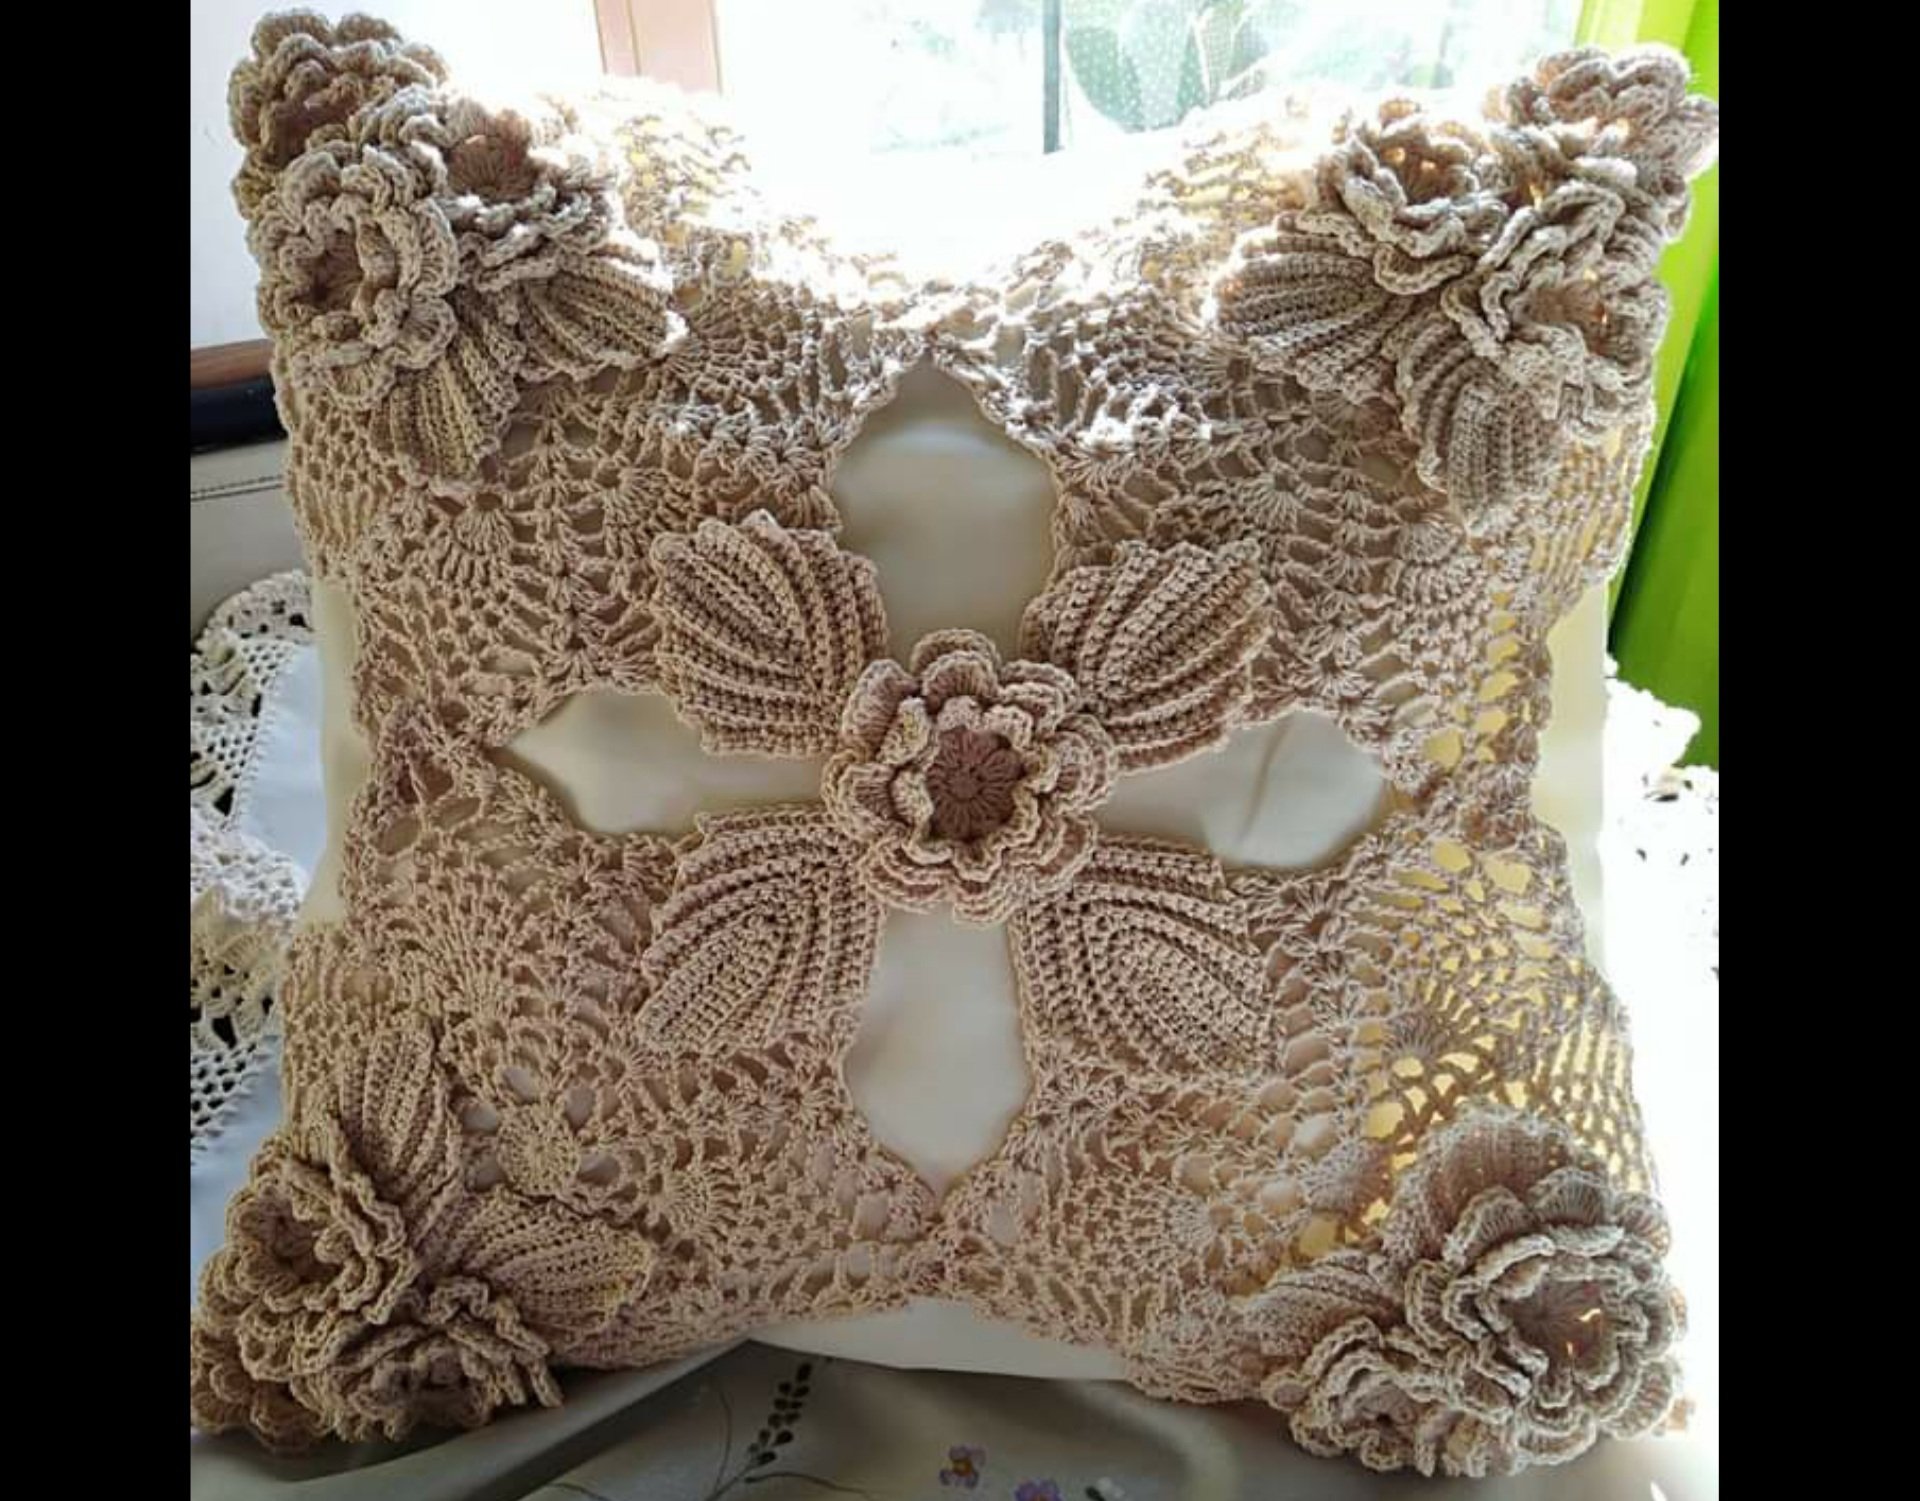
Irish Crochet Cushion Cover is a delicate and versatile work that has a very beautiful and stylish final result. When it comes to decorating the room, you need to pay attention to detail and this cushion cover allows you to give a touch of class, style and elegance to the room where it will be used, whether in the bedroom or living room or even on that little sofa in the reading corner, you can believe you will love the result. This crochet item has a very important role and manages to give harmony to the house.
They must be chosen according to the environment where they will be and must have a defined number of pieces. They become a highlight in the decoration and to choose, it is necessary to evaluate the entire environment, which should not be visually charged, remember this well as it is a very important detail. Many think that they just complete the decoration when in fact their importance is much greater.
The cushion completes and gives harmony to the decor, but they must meet the requirements of fabric, print, finish, layout and even padding, everything is important. Crochet allows us to make items like this with incredible highlights and worth investing in.

See Also:
➽ Crochet Dress (Motif/Top)
➽ Crochet Doily Interlocking Rug
➽ Crochet Sweater
Irish Crochet Cushion Cover
MATERIALS
• Wool Yarn: Natural
3 Balls
• Crochet Hook – Size K-10.5
• Crochet Hook – Size I-9
• Stitch Markers
• Large-Eyed Blunt Needles
• Additional Materials
Fiberfill (for stuffing Rose Centers)
GAUGE:
Exact gauge is not important to this project
With larger hook and 2 strands held together, ch 29.
Row 1: (Dc, ch 3, dc) in 6th ch from hook, *sk next 3 ch, (dc, ch 3, dc) in next ch; rep from * 4 more times, sk next 2 ch, dc in last ch.
Row 2: Ch 2, turn, 3 sc in next ch-3 sp, *sc in sp between next 2 dc, 3 sc in next ch-3 sp; rep from * 4 more times, sc in top of turning
ch.
Row 3: Ch 3, turn, sk first 2 sc, (dc, ch 3, dc) in next sc, *sk next 3 sc, (dc, ch 3, dc); rep from * 4 more times, dc in ch-2 sp of
previous row.
Rep Rows 2 and 3 until piece measures about 57 in. (145 cm) from beg; end with Row 2. Do not fasten off.
Picot Edging
Note: Edging is worked along 3 sides of Scarf.
With RS facing, ch 4 (for picot); pivot to work in ends of rows along long edge of Scarf, 3 sc in end of next row, sc in end of next sc row,
ch 4, *2 sc in end of next row, sc in end of next sc row, ch 4; rep from * to next corner sp, 4 sc in corner sp; pivot to work along
opposite side of foundation ch, sc between next 2 dc, **3 sc in next ch-3 sp, sc between next 2 dc; rep from ** to next corner, work 4
sc in corner sp; pivot to work in ends of rows along opposite long edge of Scarf, sc in end of next row (in ch-2 sp at row end), ***ch 4,
2 sc in end of next row, sc in end of next row; rep from *** to last dc row, 3 sc, ch 4 in end of last dc row, ch 4, sl st in end of last row
(in ch-2 sp at row end). Fasten off.
ROSES (make 8)
With larger hook and 2 strands held together, ch 6; sl st in first ch to form a ring.
Rnd 1: Ch 6, dc in ring, *ch 3, dc in ring; rep from * 3 more times, ch 3; join with sl st in 3rd ch of beg ch.
Rnd 2: (Sc, hdc, 3 dc, hdc, sc) in each ch-3 sp around; join with sl st in first sc.
Rnd 3: Working behind sts of Rnd 2, ch 5, *sc in next dc of Rnd 1, ch 5; rep from * around, join with sl st in first ch.
Rnd 4: (Sc, hdc, 5 dc, hdc, sc) in each ch-5 sp around; join with sl st in first sc.
Rnd 5: Working behind sts of Rnd 4, ch 5, *sc in next sc of Rnd 3, ch 5; rep from * around; join with sl st in first ch.
Rnd 6: (Sc, hdc, 6 dc, hdc, sc) in each ch -5 sp around; join with sl st in first sc. Fasten off.
ROSE CENTERS (make 8)
Note: Work in continuous rnds; do not join or turn. With smaller hook and 2 strands held together, ch 4; sl st in first ch from to form a
ring.
Rnd 1: Ch 1, work 2 sc in each ch around – 8 sc.
Place marker in first st for beg of rnd; move marker up as each rnd is completed.
Rnds 2 and 3: Sc in each sc around.
Stuff center with fiberfill.
Rnds 4 and 5: Sc in each sc around.
Rnd 6: *Sl st in next st, sk next st; rep from * around – 4 sc.
Fasten off.
LARGE LEAVES (make 4)
With smaller hook and 2 strands held together, ch 17.
Row 1: Sc in 3rd ch from hook, sc in each ch across to last ch, 3 sc in last ch (for point); pivot to work along opposite side of foundation
ch, sc in each ch across – 31 sc.
Row 2: Ch 1, turn, sk first st, sc in each sc to center sc of 3-sc point, 3 sc in center sc (point), sc in each sc to last 3 sc; leave last 3 sc
unworked.
Rows 3–7: Rep Row 2.
Fasten off.
SMALL LEAVES (make 8)
With smaller hook and 2 strands held together, ch 13.
Work as for Large Leaves.
FINISHING
Sew a Rose, 2 Large Leaves and one Small Leaf to each end of Scarf.
Sew remaining Roses to Scarf as desired, sewing a Small Leaf at base of each Rose. Sew a Rose Center to each Rose. Weave in ends.

Our Team’s Opinion About This Pattern
Irish Crochet Cushion Cover, wanting to change your decor? Just come with me and let’s do this amazing cushion cover!! This amazing piece will change your decor to a stylish one, I’m sure you’ll love the result of this piece on your house. this will surely make your customers want one like it, which will help you in sales!!
Want to make this amazing Irish Crochet Cushion Cover? Then set aside all your material and tools before starting your piece so that you already have everything close at hand, this way it’ll be easy to carry out this project, follow the tutorial carefully, make your piece while following the tutorial and I’ m sure that you will be able to make this amazing work easily.