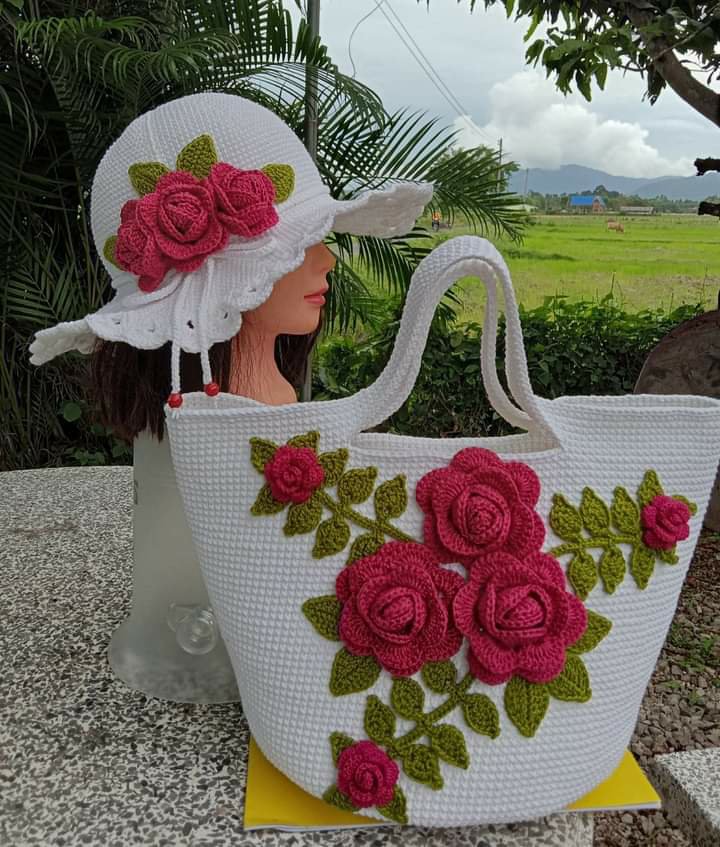
Crochet Bag and Hat, a great set, a beautiful bag and a stylish crochet hat. It appeared in primitive peoples of prehistory for the protection of the head against the sun, cold and rain and over the centuries it became an important accessory for head decoration that is widely used nowadays. The hat is a very important accessory, especially in summer on hot sunny days and when you want to go for a walk to the beach or walk.
Crochet Bag and Hat, a perfect bag for a relaxed and fun look. Easy to make and has a very beautiful result that will delight you. Perfect for those days of sightseeing need to take few things. Beauty is often found in the simplicity of the work and the strength of the craft that is versatile and looks good on all occasions.
Usually we always think about having news regarding the bag and it is well crafted and a color that greatly favored this piece. Whether they are simple or more sophisticated, they are part of everyday life and are very useful.

See Also:
➽ Hindsight Afghan Crochet Block
Crochet Bag and Hat
Abbreviations
ch=chain
ch(s)=chains
hdc= half double crochet
sc= single crochet
Bag:
Abbreviations
ch= chain
ch(s)= chains
hdc= half double crochet
sc= single crochet
Step 1
Round 1: Chain 42 (40 + 2 for turning chain)
Step 2
Round 1: make 2 hdc in the 3rd chain from the hook (the two chains that you skipped are your turning chain)
Step 3
Round 1: make 2 hdc in the next chain. Add a stitch marker to the LAST of the four hdc you made. You should now have four hdc.
Step 4
Round 1: hdc once in each of the next 36 chains (you will have two chains remaining)
Step 5
Round 1: make 2 hdc in each of your last two chains and turn your work (picture shows work already turned). You will now work in the BACKSIDE of your chain(s). Add a stitch marker to the FIRST of the four hdc you made.
Step 6
Round 1: You are now working in the backside of the chains. We are going to repeat what we did in the front of the chains. Make 2 hdc in each of your first two backside chains. Add a stitch marker to the LAST hdc made (this stitch marker is NOT in this photo but can be seen in the photo for step 7)
Step 7
Round 1: hdc once in each of the next 36 chains (you will have two backside chains remaining)
Step 8
Round 1: make 2 hdc in each of your last two backside chains. Add a stitch marker to the FIRST of the four hdc you made.
Step 9
Round 1: Join in the round with a slip stitch to the first hdc of round 1. You should have 88 total stitches at the end of round 1.
Your stitch count between the stitch markers should be 36 (on both sides).
Your stitch count on each end should be 8 (including the stitch with the marker).
ROUND 1 OF BAG BOTTOM
Bag Bottom: Round 2
Step 10
Round 2: Chain 2, 2 hdc in each of the first two stitches. Move your stitch marker to the LAST of the four hdc you made. You should now have four hdc for round 2.
Step 11
Round 2: hdc once in each of the next 40 stitches (you will have to remove a stitch marker from round 1 to work into the stitch)
Step 12
Round 2: make 2 hdc in each of the next two stitches. Add a stitch marker to the FIRST of the four hdc you made.
Step 13
Round 2: make 2 hdc in each of the next two stitches. Move stitch marker to the LAST of the four hdc you made.
Step 14
Round 2: hdc once in each of the next 40 stitches (you will have to remove a stitch marker from round 1 to work into the stitch)
Step 15
Round 2: make 2 hdc in each of your last two stitches. Add a stitch marker to the FIRST of the four hdc you made.
Step 16
Round 2: Join in the round with a slip stitch to the first hdc of round 2. You should have 96 total stitches at the end of round 2.
Your stitch count between the stitch markers should be 40 (on both sides).
Your stitch count on each end should be 8 (including the stitch with the stitch marker).
ROUND 2 OF BAG BOTTOM
Bag Bottom: Round 3
Step 17
Round 3: Chain 2, 2 hdc in each of the first two stitches. Move your stitch marker to the LAST of the four hdc you made. You should now have four hdc for round 2.
Step 18
Round 3: hdc once in each of the next 44 stitches (you will have to remove a stitch marker from round 1 to work into the stitch)
Step 19
Round 3: make 2 hdc in each of the next two stitches. Add a stitch marker to the FIRST of the four hdc you made.
Step 20
Round 3: make 2 hdc in each of the next two stitches. Move stitch marker to the LAST of the four hdc you made.
Step 21
Round 3: hdc once in each of the next 44 stitches (you will have to remove a stitch marker from round 1 to work into the stitch)
Step 22
Round 3: make 2 hdc in each of your last two stitches. Add a stitch marker to the FIRST of the four hdc you made.
Step 23
Round 3: Join in the round with a slip stitch to the first hdc of round 2. You should have 104 total stitches at the end of round 3.
Your stitch count between the stitch markers should be 44 (on both sides).
Your stitch count on each end should be 8 (including the stitch with the stitch marker).
ROUND 3 OF BAG BOTTOM
Bag Bottom: Round 4
Step 24
Round 4: Chain 2, 2 hdc in each of the first two stitches. Move your stitch marker to the LAST of the four hdc you made. You should now have four hdc for round 2.
Step 25
Round 4: hdc once in each of the next 48 stitches (you will have to remove a stitch marker from round 1 to work into the stitch)
Step 26
Round 4: make 2 hdc in each of the next two stitches. Add a stitch marker to the FIRST of the four hdc you made.
Step 27
Round 4: make 2 hdc in each of the next two stitches. Move stitch marker to the LAST of the four hdc you made.
Step 28
Round 4: hdc once in each of the next 48 stitches (you will have to remove a stitch marker from round 1 to work into the stitch)
Step 29
Round 4: make 2 hdc in each of your last two stitches. Add a stitch marker to the FIRST of the four hdc you made.
Step 30
Round 4: Join in the round with a slip stitch to the first hdc of round 2. You should have 112 total stitches at the end of round 4.
Your stitch count between the stitch markers should be 48 (on both sides).
Your sti
tch count on each end should be 8 (including the stitch with the stitch marker).
ROUND 4 OF BAG BOTTOM
Bag: Top Section
Round 1: chain 2, hdc once in each stitch in the BACK LOOP ONLY, join with a slip stitch to the first hdc [stitch count= 112]
ROUND 1 OF BAG TOP
Rounds 2- 26: chain 2, hdc once in each stitch, join with a slip stitch to the first hdc [stitch count= 112]
ROUND 2 OF BAG TOP
Round 27: chain 1, sc once in each stitch, join with a slip stitch to the first sc [stitch count= 112]
Bag Handles
Make 2.
Chain 7 (5 + 2 for turning chain)
Row 1: hdc in the 3rd chain from the hook (the two chains that you skipped are your turning chain) and hdc in each of the remaining 4 chains, turn [stitch count= 5]
Rows 2- 46: ch 2, hdc once in each stitch, turn [stitch count= 5]
Your handle should measure approximately 18 inches.
Measure in 1 inch from each end. Mark this spot with a stitch marker.
Leaving the 1 inch ends un-worked, fold the strap in half and single crochet the two folded ends together (this will create a tube) between the stitch markers.
Measure in 4.5 inches from each side of the tote bag (front and back). Mark these spots with stitch markers, remember this. These are the spots where you will attach your handles, so don’t forget.
You should have approximately 9.5 inches between the stitch markers.
Use your tapestry needle to sew the handles onto the bag from the inside.
Making the Flower
sl st [slip stitch] :: insert hook, yarn over, pull the loop back through the stitch, then through the loop on your hook.
dc [double crochet] :: insert hook, yarn over, pull the loop back through the stitch (two loops on hook), yarn over and pull through both loops on hook (note :: this is equivalent to the US sc stitch)
htr [half treble]:: yarn over, insert hook, yarn over, pull the loop back through the stitch (three loops on hook), yarn over and pull through all three loops on hook (note :: this is equivalent to the US hdc stitch)
tr [treble] :: yarn over, insert hook, yarn over, pull the loop back through the stitch (three loops on hook), yarn over and pull through two loops on hook (two loops left on hook), yarn over and pull through remaining two loops (note :: this is equivalent to the US dc stitch)
To begin, chain 26.
:: Row 1 :: Start in the 2nd chain from hook (as shown above with my needle) and work a row of double crochet. You should count 25 stitches altogether. Turn the work.
:: Row 2 :: Start in 2nd chain from hook (as shown above with my needle)….
….work 5 treble stitches (as above) into the same stitch.
Slip stitch into next stitch (as above). This is your first large petal made.
Work 5 tr’s into next st, sl st into next st (2nd large petal made)
Repeat between ** 3 more times until you have 5 large petals (as above)
Work 5 htr’s into next st, sl st into next st (1st medium petal made)
Repeat between ** 3 more times until you have 4 medium petals.
*work 5 dc’s into next st, sl st into next st (1st small petal made)
Repeat between ** twice more until you have 3 small petals.
Fasten off leaving a 20cm tail end for stitching up.
You should have what looks like a curly-wurly row of 12 petals (5 large, 4 medium and 3 small). It should already be naturally curling itself round to form the rosy shape so don’t expect it to lie flat.
:: Stitching :: first of all, darn in the short tail end from the beginning of the foundation chain.
Now thread the long tail end onto a darning needle, and begin by tightly curling the small petals around in a spiral (as above)
Now turn your rose over so that you are looking at the back of the petals with the straight line of the foundation chain nearest to you. As you curl and roll the small petals round in a spiral, begin to make small stitches through the layers of the foundation chain to hold the petals in place.
Now keep gently rolling the petals around the centre, securing them with stitches as you go.
Bear in mind you’ll need to regularly turn the rose over to check that it’s forming well. It shouldn’t be too tight and scrunched up, but not too loose and open either. You’re aiming for quite a neat, compact spiral shape. But don’t worry too much about how you are making the stitches either, it really doesn’t matter. So long as they are holding all the petals securely in place that’s ok as you will not see them.
When you come round to stitching the large outer petals, you should be aiming to create a neat five-petal flower shape. When it’s all stitched securely in place, fasten off.
You should find that once you’ve made one and got a hang of the stitching up bit (which is harder than the actual crochet bit in my opinion), the second one will be a complete doddle. Believe me, you will be so happy when you breeze through the second one that you will need to make many more instantly. You will start searching frantically through your stash, dragging out every shade of red-pink-purple that you can lay your hands on. Just a gentle warning….these are super addictive!
Want to find some green yarn and try a few leaves now??
:: To begin :: chain 8.
Start in the 2nd chain from hook (as shown above with my needle) and work the following…
dc, htr, tr, 2tr’s, tr, htr, dc. That’s the first side of your leaf made.
Now you are going to make the pointy end bit, so chain 2, then insert hook through the 1st chain (see where I’ve put my needl
Making the Leaves
First, start by: chain 10, leaving 8” beg tail
Side 1: working in back loops of beginning chain, 3 dc in fourth st from hook, dc in next 3 sts, hdc in next st, sc in next st, sl st in last st, ch 1, sl st in ch just made (leaf point made)
Side 2: working down the other side of the beginning chain in the front loops, sl st in next st, sc in next st, hdc in next st, dc in next 3 sts, work 3 dc in next st, join with sl st to top of beg ch 3
Stem: chain 4, sl st in second st from hook and in next two sts. sl st to next dc, finish off weaving in all loose ends.
What Do We Think About This Pattern
A beautiful Crochet Bag and Hat a beautiful bag that combines with a beautiful and stylish hat that will leave you amazed and with a simply perfect look. They are great pieces to help assemble new looks that will leave everyone amazed, in addition to being a piece that promises to be successful among your customers, you can be sure that they will love this set.
How about we make this Crochet Bag and Hat? So follow the tutorial and I’m sure you’ll be able to make this piece quickly and easily. A great tip is that you separate your material and your tools before making this piece, so you can follow the tutorial while making the piece, that way you’ll be able to do everything perfectly.