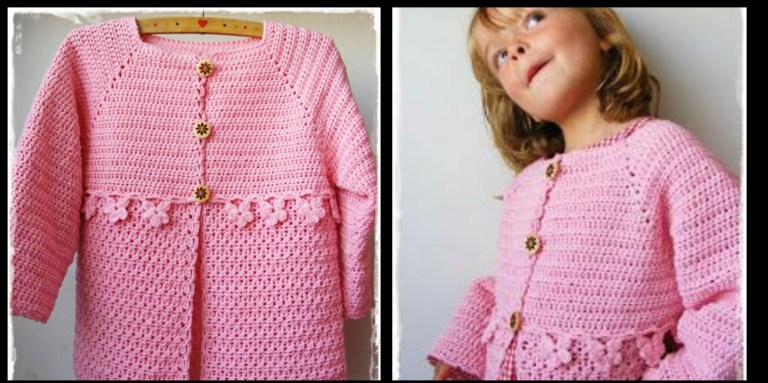
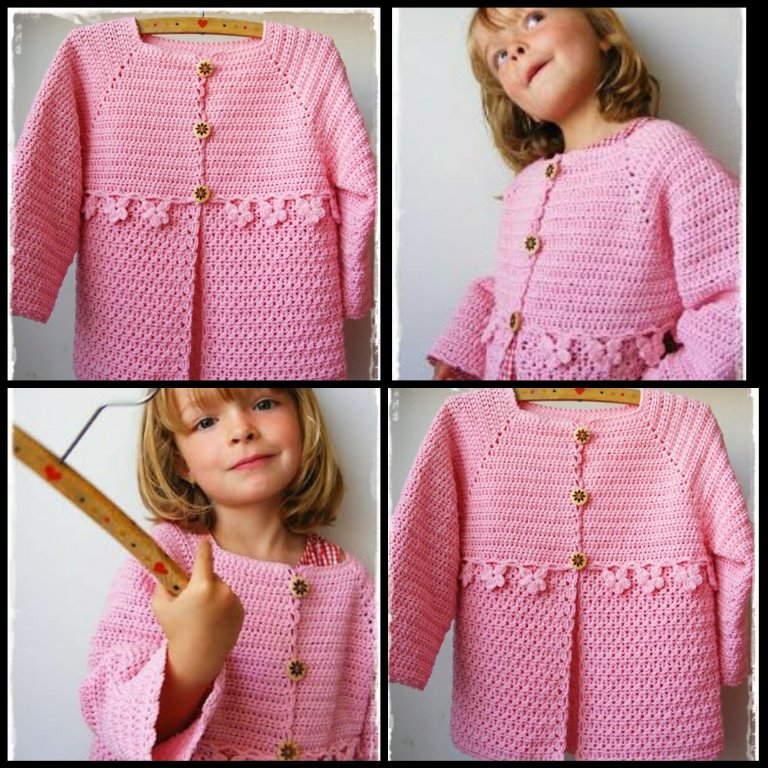
Crochet Baby Sweater, very simple and delicate, this beautiful blouse is easy to make and you can quickly be ready, which helps even more. So the child can have another beautiful crochet piece at their disposal. It is very gratifying to be able to make such a beautiful piece, so be inspired by this blouse model, leaving your baby with a modern look and, if you want, create new walnuts from this model.
Comfortable, this blouse is ideal for days that start to get cold, especially in the afternoon and morning. The colors are up to you as always, use the one that matches the baby‘s wardrobe, as it is a beautiful piece to complete your look. For those who crochet and also beautiful pieces for your baby, this sweater is great.
It is also an important piece for those who usually sell craft products, as moms love to leave their babies well dressed and are always looking for pieces like this. Thank you for visiting our website. We always try to bring you the best.
See Also:
➽ Flower Valley Shawl Crochet
➽ Moonpetals Doily Crochet
➽ Rainbow Sister Shawl Crochet
Crochet Baby Sweater
Material Used:
- Crochet Yarn: 100% cotton will be too heavy. so look for something lighter, mixed. for instance LORENA yarn from Madame Tricotte Paris or Bella Baby Marvel Soft Baby 4-ply acrylic yarn (in off white) with
- Crochet hook: 3.5 mm
Abbreviations used :
ch : Chain sp(s) : Space(s)
dc : Double crochet hk : Hook
st(s) : Stitch(es)
sl-st : slip stitch
sk : Skip sp : space
rep : repeat
fsc : Foundation single crochet
Let’s Begin
Part 1 : Yoke
- I started with fsc as per the chart given for necklines (at the top of this blog).
- See the number of stitches needed for the back/front and sides, and place markers accordingly for the corner stitch
- In the corner stitch for the first row, I have worked (3 dc; ch 1, 3 dc) all in that same st.
- In all following rows, I’ve worked the (to) in the ch-1 sp for the corners.
- I’ve decided to change colors every other row, and I’ve decided to use sc down the row (instead of dc), so in the corners, I’ve opted to work in a
(3 sc ; ch 1, 3 sc) in the corner ch-1 sp.
- I suggest you work the raglan yoke pattern till you reach the armhole or till you get the width needed for the chest (round measure), whichever is first.
- You will continue then without further increases for the pattern of the lower part of the sweater.
Part 2 : Body of the sweater
This is one pattern I’ve not been able to fathom. There is no chart, and the photo tutorial eludes me. I am not sure what that stitch is.. I figured that it’s worked in sc and we’re picking up 5 sts at a time – but try as I may, I am not getting the same look as this pink project. Ah well, time to create and get cracking.
I’ve decided to use the Star Stitch in my project, working over 5 sts.
Before we plunge into the stitch, I’d like to explain what a Star Stitch is.
- The Star Stitch is always worked only on the front of your work.
- For this beautiful stitch, we pick up a set of 5 loops and then work through all of them. “Pick up a loop” means that you will put your hook into the stitch indicated, yarn over and draw or pick up a loop.
- You will have a set of 5 sts on your hook before you will yarn over and pass it through all the stitches, to make one start stitch.
- There is an “eye” to this Star stitch. The “eye” is the top point of the stitch, which serves as the 1st “stitch” for the next and all following stitches.
- For your 2nd and all following stitches, you will put your hk into the ‘eye’ of the last star stitch and draw a lp, then pick up a lp in the last st of the previous star stitch, and finally pick up lps in the next 2 sts. You will then complete this star stitch by working a yarn over, and then passing through all the loops on your hk.
So that’s the Star stitch that we’re using here.
There’s another thing that we need to do as we start on the body of our sweater, and that’s to join the fronts and back across the armhole. I have joined the two parts in the 1st row of the body of the sweater.
Fold your work in half and (if needed mark the corners that will be joined) work the first row such that you join the back and front.
Our stitch count is multiples of 2.
Depending on how lacy or ‘holey’ you want your project, work an sc (less holes) or a hdc in the following row.
Row 1 : (Wrong side of work) : 2 hdc in the 1st st ;
(sk next st ; 2 hdc in the next st) ;
rep (to) till the last 2 sts ;
sk next st, 2 hdc in the last st. Turn.
In this row, we will work our Star Stitch
Row 2 : (Right side of work) :
[yo, insert hk in the 1st st ; yo, insert hk in the next st ;
yo and pass through the 5 lps on hk] ;
ch 1 (creates the “eye” of the Star St) ;
- {insert hk in the “eye” just made and draw a lp ;
insert hk in the last lp of the previous Star st just made and draw a lp ;
insert hk in the next 2 sts and draw up 2 lps ; yo and pass through the 5 lps on hk} ;
ch 1 (creates the “eye” of the Star St) * ;
rep to till the end. Turn.
In the following row, we will work only in the “eyes” of the Star St.
The last st that you’ve worked in the previous row was the ch 1, that forms the eye, and this will be the 1st eye you will work in.
Yet again, depending on how lacy or ‘holey’ you want your project, (or depending on what stitch you used in Row 1, work a sc or a hdc in the following row.
Row 3 : (Wrong side of work) : 2 hdc in the 1st “eye” and in each “eye” till end. Turn.
And though this seems totally unbelievable, we’ve just finished one pattern repeat. Please put your work down and admire the beauty you’ve created.
Rep Rows 2 & 3 till your pattern reaches the length needed.
If you are planning on working a button placket and/or a base border, please ensure to work the length accordingly to keep space to get that border in.
Part 3 : Sleeves
So initially, I used two colors for my yoke ..the idea being to carry that color combination down the arm. The yoke has been done with just hdc all around, so for the sleeves too, I’d suggest you keep it with hdc all around.
And then I thought that I’d use the body pattern on the sleeves – and this is what I’ve eventually gone with. So you now have two ideas for your sleeves.
To start pick up where you’ve left off at the armhole
and work a round of hdc in each st all around. Continue with hdc in each st all around for every round till you are about 1” from the sleeve
length needed. If you want a wider sleeve cuff, then you will work that many inches short for the sleeve – i.e if you need a sleeve length of 15” and are going to work in a 2” border, you will work in hdc till you have a sleeve length of 13” and then work this border in for the last 2”.
The other idea is to work the body Star Stitch pattern down the arm. For this once again, I’d suggest we start with a round of hdc all around, and join with a sl-st at the end. The Star Stitch must only be worked along the front / right side of work, which suits us perfectly as we will be working in rounds. Remember that yet again, you will work the 2 hdc only in the eyes of the Star stitch, which will be simpler to “find” as you’re working on the right side of your work.
Border :
Round 1 : sc in the 1st hdc and in each hdc till the end. Join with a sl-st to the 1st st.
For our border, we’ll be working with the Camel stitch.
The Camel stitch is a variation of the Single crochet back loop stitch. The only difference is that you work the stitch in the loop after the back loop – which is called the ‘third loop’.
In case you find the Camel stitch too hard, may I suggest you work the sc in back loops only (sc-blo) and that will give a really lovely ribbed effect as well.
How to do the Camel stitch : The camel stitch is a lot like the back loop stitch, but you get a knitted finish on the top of your work.
Round 2 : Camel stitch in the 1st sc and in each sc all around.
Rep Round 2 till you have the border / cuff length needed.
Before you fasten off, please check that your sleeve length is correct, and then fasten off and weave in ends.
Repeat for the 2nd sleeve as well.
Part 4 : Front placket and border for sweater
I have decided to work one continuous border for my sweater, which will start at the front placket, go around the back of the neck, come back around the front of the sweater for the other placket, and then go around the bottom of the sweater to join back at where I started.
So there are ideas here :
- You could yet again try to work the Star Stitch as a front panel, and then work a smaller border wherein you can work the button holes ; OR
- You can work the Camel stitch all around. The beauty of the Camel stitch can only be seen when worked on the front or right side of the garment, and it can therefore only be worked in a round. This suits us perfectly when working it the way I’ve planned ; OR
- You can work both the Star Stitch and the Camel stitch as borders.
That said, yet again, if you decide to work the sc-blo, here’s your chance to be different and unique.
As we’ve just worked the Camel stitch around the sleeve cuff, you know what we need to do.
You will start with a round of sc all around from the front, around the back, down the other front and then around the lower part of your sweater. Remember that at each corner, you will need to work in 2 or 3 sc in the same st to get a neat turn. I say 2 or 3 as this depends on the thickness of your yarn – the thicker the yarn, the more bukly that turning will be, so 2 sts should suffice. However, you will need to see what looks neat and flat and work it accordingly.
Your Round 1 will be the 1st round of Camel stitch all around and you will join with a sl-st at the last st.
I suggest that you work as many rounds here as you did for the cuff, just to get a uniform look.
If you are planning on this being a button-down sweater, you will need to add in a set of button holes along one side of your front placket. For adding a button hole all I’ve done is work 2 ch (or as many ch needed depending on the size of your button as well as the thickness of your yarn) and sk the next 2 sts. Space your holes by working the Camel st in between 2 sets of skipped stitches (that will determine the distance between two buttons).
In the next round, you will work a Camel st or sc-blo in the ch-2 sp. The difference in working the sc in this space is that usually one works the st directly into the space, but in this case, I’ll suggest that you work your stitch into the chains you’ve made and not into the ch-sp.
In the next round, you will work a Camel st in each st all around.
Rep the last round till you have a border / placket of the size needed. Remember that it looks really neat if you have your button holes in the middle of the placket, so do decide the width you want before you start this exercise.
Part 5 : Make your own button
I should also share a new idea I had for the button. I had these lovely little pink beads that I’d already used on that final row, and thought they’d look lovely as a button. So first I took a regular shirt /pant button and covered it with a little fabric. I then sewed in the beads onto that little fabric top. The base of the button was easy to attach on, as there is the fabric to hold on to.. and I think the end result is pretty amazing.. what do you think?
Our Team’s Opinion About This Pattern
Crochet Baby Sweater, a great piece with an amazing look that will leave your little one with a cute and cute look that will amaze everyone. This beautiful piece will provide incredible looks that everyone will love and you can be sure that your customers will want one for their little ones too, believe me you will love this piece.
Want to make this wonderful Crochet Baby Sweater? So it’s simple, separate all your material and your tools before starting your piece, this will facilitate the execution of this project we brought, follow the tutorial carefully, make your piece while following the tutorial and I’m sure you’ll be able to make this beautiful project easily .